Valknut – Workout Tracking

Valknut is a workout tracking application. It is designed to keep logs about any kind of weighlifting activity, such as barbell training, bodyweight training or dumbbell workouts.

The original motivation for this project was to serve as a personally tailored replacement to commercial offerings.

History

The initial product idea germinated in the year 2016 as a means to store personal health information safely on an individual desktop computer, away from prying eyes. To that end, the application never considered the possibility of multiple simultaneous users, authentication, or non-local persistence. Each individual user would store their own records in their personal file, which would be protected by the user’s own encryption key. The project was rather unimaginatively titled Fit Net.

After remaining shelved for a very long time, I picked it up again in 2020 to breathe some life back into it. Among other things, I changed it into a web application since that was a platform I knew well by then, and renamed it to a much more distinguished Valknut, invoking imagery of Norse mythology, Viking warriors and Valhalla.

Does a workout even count if you don’t feel at the threshold of Valhalla by the time it’s complete?

Project Status

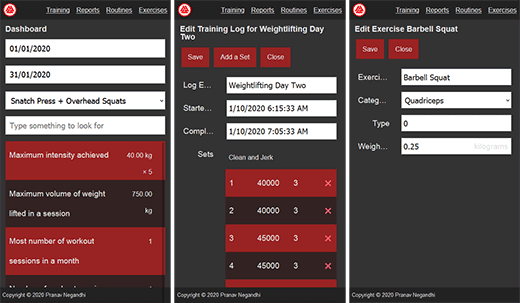
The product is in what I call functionally usable state. It provides all necessary features to capture, store, retrieve, edit and delete the most essential facets of a weightlifting regimen. A basic summary report has been implemented.

The architecture of the application still aspires to be amended into a desktop-based product someday.

Architecture

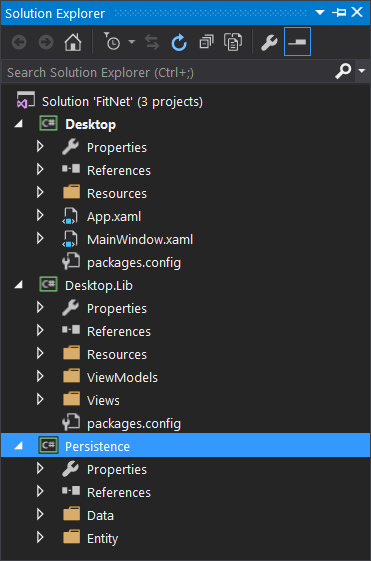
Valknut follows classical MVC architecture. The application is separated into three projects for the user interface, the querying engine and the entity model classes. The website project contains classes that implement the web controller interfaces and the views. The querying engine provides repositories, data-error abstractions and query and filtering operations. The models project is a class library to implement the entities that make up the domain model.

The following links expand upon select architectural aspects of the product.

Domain Model

Localisation

Validation

View Models

JSON Handler

Adding Some Life

The previous installment in the Building FitNet series explained how to connect a view-model with a view, using a modular and extensible architecture. In this episode, I explain how interactivity can be added to the user interface.

The simplest interactive UI control is a button. You click on it, and it executes some action. Buttons in Windows Forms worked the same way. But WPF takes the button and turns the knob up to 11. Buttons in WPF can take on literally any appearance that you can dream of. Building the user interface using XAML is already so much better than using the Designer or literal code statements. Features such as data binding are added bonus and allow for more dynamism in the user interface. You can bind the appearance of a Button instance to a view-model that reacts to the state of the application and literally make things dance.

The change in architecture also extends to the use of the event handlers. The built-in System.Windows.Controls.Button class has a property called Command, which can be bound to the view-model of the instance. The Command property is of type System.Windows.Input.ICommand. Any class that implements this interface can be attached to this property.

This sounds a bit counterintuitive at first. Why have a special type, when a simple function can suffice?

And the answer is separation of concerns. A command decouples the object that invokes the command from the object that executes the command.

The ICommand interface also provides additional properties that make it easy to control the state of the button with a bit of additional code.

public class RelayCommand : ICommand
{
    public RelayCommand(Action execute, Func<bool> canExecute)
    {
        …
        _execute = execute;
        _canExecute = canExecute;
    }
 
    event EventHandler ICommand.CanExecuteChanged
    {
        // Event dispatched event when the state of the CanExecute property changes
        …
    }
 
    bool ICommand.CanExecute(object parameter)
     {
         return null == _canExecute ? true : _canExecute();
     }
 
    void ICommand.Execute(object parameter)
     {
         _execute();
     }
}

The Command property of the button is assigned an instance of RelayCommand. This class constructor takes two parameters – an Action delegate called execute and a Func<bool> delegate called canExecute. The Action is called when the command is to be executed, whereas the Func<bool> determines if the command can be executed at all or not.

This is useful for performing runtime checks on the validity of input. The CanExecute delegate is triggered automatically by the framework periodically, which keeps the state of the button updated at all times.

The Command object should be made available through the view-model so that the button can be bound to it.

public class CalculatorViewModel
{
    public CalculatorViewModel()
    {
        TryCalculateCommand = new RelayCommand(TryCalcuate, CanTryCalculate);
    }
 
    public ICommand TryCalculateCommand
     {
         get;
         private set;
     }
 
    private void TryCalcuate()
    {
    }
 
    private bool CanTryCalculate()
     {
         // Validate the input fields and return a boolean
     }
}

That’s it! All that’s left is to bind the Command property of the Button instance to the TryCalculateCommand property in the view-model.

<Button Content="Calculate" Command="{Binding TryCalculateCommand}"/>

Collectively, these minor improvements in paradigm make WPF a much nicer framework to use over its predecessors.

In With the New

It turns out that there is a much better way to manipulate the user interface in WPF which is based on view-models. I cover this aspect in this episode of Building FitNet.

The System.Windows.Application class is the core of a WPF program. An instance of this class remains in memory for as long as the application is running. In order for the application to do something useful, programmers must extend this class and customise its behaviour to the needs of their own application. By convention, the primary application window is also instantiated by this class in the OnStartup event handler.

private ShellViewModel _shellViewModel;

override public void OnStartup(StartupEventArgs e)
{
  base.OnStartup(e);
  _shellViewModel = new ShellViewModel();

  var window = new Shell();
  window.DataContext = _shellViewModel;
  window.Show();
}

An instance of the ShellViewModel class is assigned as the view-model for the application window through its DataContext property. When the properties in the view-model instance change, it dispatches a PropertyChanged event along with the name of the changed property. Corresponding event handlers in the window object then query the view-model for the new state and update the appearance of the display. The ShellViewModel class must implement the System.ComponentModel.INotifyPropertyChanged interface for this behaviour.

The following example illustrates this by changing the title of the application window.

public class ShellViewModel
{
  …
  public string Title
  {
   get
   {
     return _title;
   }

   set
   {
      _title = value;
     var e = new PropertyChangedEventArgs("Title");
     PropertyChanged(this, e);
    }
  }
}

Specific properties of the view are bound to their corresponding counterparts in the view-model. In this example, the Title property of the Window class is bound to its namesake in the view-model.

<Window … Title="{Binding Path=Title}">
  …
</Window>

Therefore, when the title changes on the view-model, the change gets reflected on the view. The key here is assigning an instance of the ShellViewModel to the DataContext property, which establishes the bindings between the view and the view-model.

This concept is key to understanding and implementing properly architected WPF applications.

Binding On-Screen Views

This concept of binding a view to data can be extended to any type. Primitive types are rendered as strings. For complex types, programmers can build composite views made up of several different fundamental UI elements such as labels, text fields and buttons. Properties in the view-model are bound to these controls.

In order to render the content in the window, the application must instantiate ContentControl, which is shipped along with WPF. This class has a property called Content, which can be bound to any property in the view-model.

<ContentControl Content="{Binding Title}"/>

The output of the program written so far is shown below.

A string binding between a view-model and a view

When the value of Title in the view-model changes, the text rendered inside the ContentControl instance is updated to reflect the new text.

Building Compound User Interfaces

The third part of the equation is assigning a data template to the view, which describes the visual structure of an object. A data template is a window resource.

<Window…>
  <Window.Resources>
    <DataTemplate DataType="{Type system:String}">
      <TextBlock Text="{Binding StringFormat={}The application name is &#x2014; {0}}"/>
    <DataTemplate>
  </Window.Resources>
  …
</Window>

This modifies the appearance of the ContentControl instance. Instead of rendering plain text with just the name of the application, the output is decorated with some additional text and special characters, and looks like this.

An annotated string binding between a view-model and a view

The Big Picture

Essentially, the outcome of what appears on the screen is now split into three classes – a view-model, a view, and a data template that specifies which determines which view to use to render a view-model.

It’s a small step from here to building complete user interfaces using this style of programming.

This is done by having a custom view-model class for the window as shown above, then adding another view-model to it as a public, bindable property called SelectedView.

public class ShellViewModel
{
  …
  private Object _selectedView;

  public Object SelectedView
  {
    get
    {
      return _selectedView;
    }

    set
    {
      if (value == _selectedView)
      {
        return;
      }

      _selectedView = value;
      OnPropertyChanged(nameof(SelectedView));
    }
  }
}

It is preferred that SelectedView be a custom type instead of System.Object. A different view-model is required for each view that the application needs to render. For example, if the application requires tabs for a calories consumed calculator and a speed calculator, then two view-models must be made for each of these tabs. Having a common base class between them ensures type-safety when switching between the two view-models.

A custom renderer is also required for each view. Renderers are typically built on top of the UserControl class. The declarative syntax of XAML makes it very easy to build a user interface with any kind of layout.

The example below shows a SpeedCalculatorView that computes the value of speed based on the time taken and distance covered.

<UserControl …>
  <Grid>
    <Grid.ColumnDefinitions>
      <ColumnDefinition Width="150"/>
      <ColumnDefinition Width="250"/>
    </Grid.ColumnDefinitions>

    <Grid.RowDefinitions>
      <RowDefinition Height="Auto"/>
      <RowDefinition Height="Auto"/>
      <RowDefinition Height="Auto"/>
    </Grid.RowDefinitions>
    <TextBlock Grid.Column="0" Grid.Row="0" Text="Time"/>
    <TextBlock Grid.Column="0" Grid.Row="1" Text="Distance"/>
    <TextBlock Grid.Column="0" Grid.Row="2" Text="Speed"/>

    <TextBox Grid.Column="1" Grid.Row="0" Text="{Binding Time}"/>
    <TextBox Grid.Column="1" Grid.Row="1" Text="{Binding Distance}"/>
    <TextBox Grid.Column="1" Grid.Row="2" Text="{Binding Speed}"/>
  </Grid>
</UserControl>

The window resources contains a DataTemplate declaration to associate the SpeedCalculatorView with the SpeedCalculatorViewModel. The user interface is changed by setting the value of SelectedView in ShellViewModel to an instance of SpeedCalculatorViewModel.

In the next part, I will cover how to add interactivity to this application.

Out With the Old

In the previous post I described the rationale and the approach to building a custom fitness tracker for the desktop. The application was to be built using the Windows Presentation Foundation. As far as execution goes, I had a lot to learn about the correct way to use WPF. The first commit of the application followed so many WinForms paradigms that it made zero sense to involve the overhead of WPF.

FitNet Desktop screenshot

This is what the XAML that implements the above screen looked like.

<TabControl>
     <TabItem Header="Summary">
         <fit:Summary/>
     </TabItem>
     <TabItem Header="Reports">
         <Label>Reports View</Label>
     </TabItem>
     <TabItem Header="Tracking">
         <Label>Tracking View</Label>
     </TabItem>
</TabControl>

Perfectly readable, but it would quickly devolve either into a big ball of mud with XML nodes nested several layers deep in a single file, or turn into a pile of nested classes inheriting unrelated behaviour from a few common base classes. Either case was unacceptable. But I didn’t know that yet.

The second mistake was borrowing a data-access implementation from a previous project which was based on a primitive architecture. The template pattern that this layer implemented was fine for a small number of data objects. But it becomes tedious to build a separate reader and writer sub-class and its associated ancillary classes for every aggregate data type (and FitNet requires quite a few of those). I needed something that was easier to extend when it came to data access.

FitNet Desktop Solution View

The third major flaw was having monolithic namespaces out of ignorance of the WPF architectural style, and not using its paradigms to the best benefit. This resulted in the application turning into three projects – a Desktop project as the primary executable, a Desktop.Lib library project as a massive collection of view classes, and a Persistence project which implemented the aforementioned half-functioning data access layer.

I went through this path for several weeks before finally realising my folly, by which time I had actually built quite a bit of useful functionality in the application. But it was getting unwieldy to make any modifications or add new functionality. It seemed like I was constantly fighting against the framework in order to get things done.

I had finally had enough of this struggle when I had to implement a flyout for modifying the list of exercises in the database. Adding yet another node to the already crowded main window file and more inline click event handlers in the backing CS file were a clear indicator that I was doing this wrong. There was no way this could scale up elegantly.

This is where I decided to take a step back and try to understand what the heck was going on.

Fortunately I stumbled upon XPence, an expense tracking application built on WPF by Siddhartha S. and hosted with an in-depth development tutorial on Code Project.

Hang on for the next part where I finally begin to turn this ship around to a more meaningful course.

Introducing FitNet

The recent surge in fitness-related technology innovations bodes well for the future of many people. And though the Cheeto-munching, Red Bull-guzzling stereotype for the technologists behind this progress still sticks, the truth is that more people, including programmers, are gaining awareness of their physical health and nutrition and changing lifestyles to seek improvement.

Latching on to this bandwagon came a surge of fitness tracking apps. FitNotes, StrongLifts 5×5, the Starting Strength App by legendary strength-training coach Mark Rippetoe, Strong App for iOS, and many more, provide ample choice to the enthusiast as well as advanced lifter. These apps cover various aspects, from simple tracking, to full blown programme design with progressions and periodisation. Some applications work online. Your data is stored on their server, and requires an internet connection to access and update. Others are offline, or a hybrid of both modes. Many are free and use ad revenue to sustain operations. Some of the fancier ones are paid. They all have their pros and cons.

Having used a small subset of them in the past few years, I have identified certain shortcomings between them.

Incompatible Storage

This is especially annoying because most of these applications use the same database engine – SQLite. But it’s impossible to move from one application to another without a lot of manual re-entry of data.

Now this is an understandable shortcoming. Database design is an engineering activity. People approach the same problem differently based on their skill levels and priorities. Copying databases between applications will never work directly. But the problem can be mitigated to a great extent by the industry agreeing to a common minimum format that they all support, which can be used to send data out of the application. Customers do not like being locked in.

Changing Platforms

Mobile phones change often. I have found myself switching between Blackberry to Android to iOS in a few short years. Fitness journeys last a lifetime. Phones last a few years, at best.

This is to some extent, a manifestation of point 1 above. If the common minimum format were to come together, changing platforms would become much easier. However, there’s another more subtle point. The one unchanged platform over all these years has been the desktop and the Windows operating system. People usually have access to at least one Windows computer. Even though Android has become the most popular operating system, the Windows desktop remains firmly lodged into place at workplaces, schools and homes. It’s still a very stable and dependable platform to target.

Privacy

It is possible to cast all these troubles away and switch to a web-based application. However, people are not always comfortable with storing sensitive personal information on a server that is not in their control. Not to mention the risk of the company going belly-up and taking their precious PR logs along with it.

This is a no-brainer. Put the data on the user’s own computer, where they do not have to worry about losing their privacy. Include an automated backup feature that saves the encrypted data on their cloud-storage service. The data remains reasonably safe from loss as well as from prying eyes. Again, a common minimum format can prove to be very useful in the worst case scenario of 100% loss of the physical computer itself.

These were real and personal pain-points I experienced first-hand. And being a programmer gave me the ability to actually work on a solution that addresses these problems.

Introducing FitNet

The easiest replacement to these woes was a spreadsheet. Smack a new row for every workout, see real-time graph updates. It works as a log, but getting a report out of it is a chore. Besides, programming fancy reports into a spreadsheet eventually turns it into a prime feature for The Daily WTF. So that was out. Microsoft Access used to be a very good tool for this kind of tasks, but it still leaves out graphical reports. And the new monthly subscription model for Office 365 just isn’t for me.

Enter Windows Presentation Foundation.

I have been using Windows Forms since the longest time as the tool of choice for building desktop applications on Windows. It’s easy and it’s straightforward, and anybody who’s working with the previous Windows API feels perfectly at home with the new managed API that WinForms represents.

Windows Presentation Foundation is different. It is not just a wrapper around the Windows API. It’s a whole different framework which eschews the disparate development sub-frameworks from the Windows API in favour of a single well-integrated and extensible library. It also accounts for differing device capabilities in a more resilient fashion by abstracting away tasks like drawing objects relative to the device resolution and hardware accelerated graphics available out of the box without any extra effort. Finally, WPF brings a new type of resource – a XAML file – to be used as a declarative approach to building and programming user-interface elements rather than the procedural approach required by the Windows API.

This means that the following 50 lines of code –

WNDCLASSEX wc;
HWND hwnd;
MSG Msg;

// Registering the Window Class
wc.cbSize        = sizeof(WNDCLASSEX);
wc.style         = 0;
wc.lpfnWndProc   = WndProc;
wc.cbClsExtra    = 0;
wc.cbWndExtra    = 0;
wc.hInstance     = hInstance;
wc.hIcon         = LoadIcon(NULL, IDI_APPLICATION);
wc.hCursor       = LoadCursor(NULL, IDC_ARROW);
wc.hbrBackground = (HBRUSH)(COLOR_WINDOW+1);
wc.lpszMenuName  = NULL;
wc.lpszClassName = g_szClassName;
wc.hIconSm       = LoadIcon(NULL, IDI_APPLICATION);

if (!RegisterClassEx(&wc))
{
  MessageBox(NULL, "Window Registration Failed!", "Error!",
MB_ICONEXCLAMATION | MB_OK);
return 0;
}

// Create the window
hwnd = CreateWindowEx(
  WS_EX_CLIENTEDGE,
  g_szClassName,
  "FitNet Desktop",
  WS_OVERLAPPEDWINDOW,
  CW_USEDEFAULT, CW_USEDEFAULT, 400, 300,
  NULL, NULL, hInstance, NULL);

if (NULL == hwnd)
{
  MessageBox(NULL, "Could not create application window.", "Error", MB_ICONEXCLAMATION | MB_OK);

  return 0;
}

ShowWindow(hwnd, nCmdShow);
UpdateWindow(hwnd);

// Message loop
while(GetMessage(&Msg, NULL, 0, 0) > 0)
{
  TranslateMessage(&Msg);
  DispatchMessage(&Msg);
}

return Msg.wParam;

– can be distilled down to –

<Window x:Class="WpfApplication1.Window1"
xmlns="http://schemas.microsoft.com/winfx/2006/xaml/presentation"
xmlns:x="http://schemas.microsoft.com/winfx/2006/xaml"
Title="FitNet Desktop" Height="400" Width="300" />

Now it can be argued that the Windows Forms API also offers similar succinctness. But WPF takes this to a whole different level as I learned through the course of my project.

This series of articles is an ongoing log of my journey of building FitNet – a fitness tracker that meets my own needs.